| Capacitive Proximity Sensor Control Technology |
|||||||||||||||
| Capacitive Proximity Sensors
detect all materials, including liquids, powders and metallic and
non-metallic solids. These sensors are often used to control the levels
of pellets, liquids and powders in production control. Like their inductive counterparts, they are manufactured in shielded and non-shielded configurations and are available in both AC and DC power formats. The shielded models are used to detect solid products such as cartons, stacks of paper, wood or liquids through the wall of a non-metallic container. The non-shielded models are used to detect liquids or powders where the product flows around the sensor. Shielded models have a shorter detection range since part of the field is lost in the shielding process. All detection ranges given on the following pages are for a steel target which is equal to, or larger than the diameter of the sensor. Non-conductive products, such as wood or plastic, will be detected at a reduced detection range. The range at which a product is detected is directly related to the dielectric constant of the material; the greater the dielectric constant, the greater the detection range |
|||||||||||||||
|
|||||||||||||||
| Sensitivity Adjustment All capacitive models have an adjustable sensitivity that allows the calibration to be made in the field. This allows the sensitivity to be set for the target desired; for example, the sensitivity can be reduced to ignore a glass container but still detect the liquid inside the container. Similarly, the sensitivity can be reduced to ignore a build-up of a viscous product such as honey while still detecting the level when a large amount of the product reaches the sensor. To adjust the sensitivity on a Capacitive Proximity Sensor, mount the sensor in the working position. Allow the target material to reach the position where detection should take place. If the material has not been detected, rotate the sensitivity potentiometer clockwise, with the screwdriver provided, until detection first occurs (LED will illuminate). Continue to rotate the potentiometer for another 1/4 turn. Remove the target material and ensure that the sensor turns OFF (LED will turn off). If the sensor turns OFF, leave the sensitivity at that position. If the sensor remains ON, decrease the sensitivity (counterclockwise rotation) until the sensor turns OFF. For best results, position the sensitivity potentiometer half way between these two points. |
|||||||||||||||
| Capacitive Sensor Oscillator Circuit
Capacitive proximity sensors consist of an
RC-oscillator with a special multi-part sensing electrode. The electrode
and the oscillator circuit have a tube connected with earth potential
for lateral shielding. This enables flush mounting of sensor in metal,
since the electrical field is only present in front of the sensing
electrode. This field is the active zone of the sensor. When the conductive material is removed from the active zone, the oscillator is undamped and the oscillation amplitude decreases. The amplifier os the oscillator voltage and the sensitivity of the sensor can be altered by the built-in potentiometer. The middle electrode together with the built-in re-coupling gives very effective compensation under conditions of humidity, dust or icing. Special circuitry automatically compensates for these influences. The preset sensing distance remains nearly constant. The electrode design, along with the compensating circuitry of capacitive sensors, is a unique design, and provides performance advantages far superior to other capacitive sensors. |
|||||||||||||||
 Capacitive Switch Block Diagram |
|||||||||||||||
| Applications for Capacitive Proximity Sensors | |||||||||||||||
 |
 |
 |
 |
||||||||||||
| Liquid Level Control | Carton Detection | Bin Level Control | Resist Liquid Level | ||||||||||||
| Capacitive Proximity Sensors reliably detect liquid levels. | The packaging industry relies on Capacitive sensors to detect paper and cardboard cartons. | Capacitive Sensors can detect liquids, powders, plastic pellets and pastes for level control. | Use Capacitive Sensors to monitor resist liquid levels in pipes. | ||||||||||||
Sunday, October 23, 2011
How Capacitive Proximity Sensor Works?
 Proximity Sensor
How Inductive Proximity Sensor Works?
OPERATING PRINCIPLES FOR INDUCTIVE PROXIMITY SENSORS
|
||||||||||||||
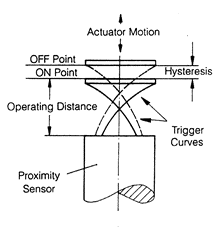
Inductive
proximity sensors are used for non-contact detection of metallic
objects. Their operating principle is based on a coil and oscillator
that creates an electromagnetic field in the close surroundings
of the sensing surface. The presence of a metallic object (actuator)
in the operating area causes a dampening of the oscillation amplitude.
The rise or fall of such oscillation is identified by a threshold
circuit that changes the output of the sensor. The operating distance
of the sensor depends on the actuator's shape and size and is strictly
linked to the nature of the material (Table 1).
|
||||||||||||||
 |
||||||||||||||
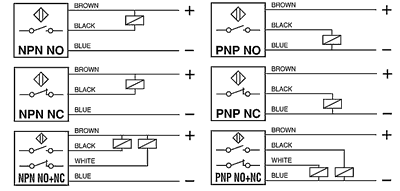
Outputs:
DC
Voltage
2 wire DC: These sensors contain an output amplifier with the function N.O. or N.C. that can pilot a load connected in series. In this system a residual current flows through the load even when in the open state and a voltage drop occurs to the sensor when it is in the closed state. Attention must be paid to these restrictions when selecting relays or electronic controls to be used with these sensors. They are compatible with P.L.C. units. 
3
& 4 wire DC: These amplified D.C. sensors contain an output
amplifier. They are supplied as 3 wire with function N.O. or NC
and as 4 wire with complementary outputs (NO + NC) in the types
NPN and PNP. Standard version include protected against short circuit,
protected against polarity and peaks created by the disconnection
of inductive loads. They are compatible with P.L.C. Units
 Analog & Linear: In these 3 wire amplified sensors a current or voltage output varies in proportion to the distance between the sensor and a metallic object. 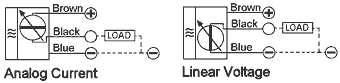
NAMUR:
These are 2 wire non-amplified sensors whose current varies
in the presence of a metallic object. The difference between these
sensors and traditional sensors is the absence of amplifier trigger
stages. Their current and voltage limits allow them to be used in
hazardous (explosive) environments when used with approved amplifiers.
In standard applications (normal atmospheres) the sensor must be
used with amplifier units ALNC, ALN2 or similar.

AC
Voltage
2 wire AC: These are two-wire sensors that contain a thyristor output amplifier. In this system a residual current flows through the load even when in the open state and a voltage drop occurs to the sensor when it is in the closed state. Attention must be paid to the minimum switching current, residual current and voltage drop when selecting low consumption relays or high impedance electronic controls to be used with these sensors. They are compatible with P.L.C. Units 
| ||||||||||||||
Wednesday, October 19, 2011
PH meter

From Wikipedia, the free encyclopedia

---------------------------------------
The probe
The pH probe measures pH as the activity of hydrogen cations surrounding a thin-walled glass bulb at its tip. The probe produces a small voltage (about 0.06 volt per pH unit) that is measured and displayed as pH units by the meter. For more information about pH probes, see glass electrode.-------------------------------------
The meter
The meter circuit is no more than a voltmeter that displays measurements in pH units instead of volts. The input impedance of the meter must be very high because of the high resistance — approximately 20 to 1000 MΩ — of the glass electrode probes typically used with pH meters. The circuit of a simple pH meter usually consists of operational amplifiers in an inverting configuration, with a total voltage gain of about −17. The inverting amplifier converts the small voltage produced by the probe (+0.059 volt/pH) into pH units, which are then offset by seven volts to give a reading on the pH scale. For example:- At neutral pH (pH 7) the voltage at the probe's output is 0 volts. 0 * 17 + 7 = 7.
- At basic pH, the voltage at the probe's output ranges from +0 to +0.41 volts (7 * 0.059 = 0.41). So for a sample of pH 10 (3 pH units above neutral), 3 * 0.059 = 0.18 volts), the output of the meter's amplifier is 0.18 * 17 + 7 = 10.
- At acid pH, the voltage at the probe's output ranges from −0.41 volts to −0. So for a sample of pH 4 (3 pH units below neutral), −3 * 0.059 = −0.18 volts, the output of the meter's amplifier is −0.18 * 17 + 7 = 4.
----------------------------------------------------------
Calibration and use
For very precise work the pH meter should be calibrated before each measurement. For normal use calibration should be performed at the beginning of each day. The reason for this is that the glass electrode does not give a reproducible e.m.f. over longer periods of time.Calibration should be performed with at least two standard buffer solutions that span the range of pH values to be measured. For general purposes buffers at pH 4 and pH 10 are acceptable. The pH meter has one control (calibrate) to set the meter reading equal to the value of the first standard buffer and a second control (slope) which is used to adjust the meter reading to the value of the second buffer. A third control allows the temperature to be set. Standard buffer sachets, which can be obtained from a variety of suppliers, usually state how the buffer value changes with temperature.
For more precise measurements, a three buffer solution calibration is preferred. As pH 7 is essentially, a "zero point" calibration (akin to zeroing or taring a scale or balance), calibrating at pH 7 first, calibrating at the pH closest to the point of interest ( e.g. either 4 or 10) second and checking the third point will provide a more linear accuracy to what is essentially a non-linear problem. Some meters will allow a three point calibration and that is the preferred scheme for the most accurate work. Higher quality meters will have a provision to account for temperature coefficient correction, and high-end pH probes have temperature probes built in.
The calibration process correlates the voltage produced by the probe (approximately 0.06 volts per pH unit) with the pH scale. After each single measurement, the probe is rinsed with distilled water or deionized water to remove any traces of the solution being measured, blotted with a scientific wipe to absorb any remaining water which could dilute the sample and thus alter the reading, and then quickly immersed in another solution.
------------------------------------
Storage conditions of the glass probes
When not in use, the glass probe tip must be kept wet at all times to avoid the pH sensing membrane dehydration and the subsequent dysfunction of the electrode.A glass electrode alone (i.e., without combined reference electrode) is typically stored immersed in an acidic solution of around pH 3.0. In an emergency, acidified tap water can be used, but distilled or deionised water must never be used for longer-term probe storage as the relatively ionless water "sucks" ions out of the probe membrane through diffusion, which degrades it.
Combined electrodes (glass membrane + reference electrode) are better stored immersed in the bridge electrolyte (often KCl 3 M) to avoid the diffusion of the electrolyte (KCl) out of the liquid junction.
----------------------------------------------------------------------------
Cleaning and troubleshooting of the glass probes
Occasionally (about once a month), the probe may be cleaned using pH-electrode cleaning solution; generally a 0.1 M solution of hydrochloric acid (HCl) is used,[1] having a pH of about one.In case of strong degradation of the glass membrane performance due to membrane poisoning, diluted hydrofluoric acid (HF < 2 %) can be used to quickly etch (< 1 minute) a thin damaged film of glass. Alternatively a dilute solution of ammonium fluoride (NH4F) can be used. To avoid unexpected problems, the best practice is however to always refer to the electrode manufacturer recommendations or to a classical textbook of analytical chemistry.
--------------------------------------
Types of pH meters

---------------------------------------
History
The first commercial pH meters were built around 1936 by Radiometer in Denmark and by Arnold Orville Beckman in the United States. While Beckman was an assistant professor of chemistry at the California Institute of Technology, he was asked to devise a quick and accurate method for measuring the acidity of lemon juice for the California Fruit Growers Exchange (Sunkist). Beckman's invention helped him to launch the Beckman Instruments company (now Beckman Coulter). In 2004 the Beckman pH meter was designated an ACS National Historical Chemical Landmark in recognition of its significance as the first commercially successful electronic pH meter.[2]In the 1970s Jenco Electronics of Taiwan designed and manufactured the first portable digital pH meter. This meter was sold under Cole-Parmer's label.
Wednesday, October 5, 2011
How Rotary Encoder Work?

A rotary encoder, also called a shaft encoder, is an electro-mechanical device that converts the angular position or motion of a shaft or axle to an analog or digital code. The output of incremental encoders provides information about the motion of the shaft which is typically further processed elsewhere into information such as speed, distance, RPM and position.
The output of absolute encoders indicates the current position of the shaft, making them angle transducers.
Rotary encoders are used in many applications that require precise shaft unlimited rotation—including industrial controls, robotics, special purpose photographic lenses, computer input devices (such as optomechanical mice and trackballs), and rotating radar platforms.
There are two main types: absolute and incremental (relative).
Absolute rotary encoder
Construction
Digital absolute encoders produce a unique digital code for each distinct angle of the shaft. They come in two basic types: optical and mechanical.Mechanical absolute encoders
A metal disc containing a set of concentric rings of openings is fixed to an insulating disc, which is rigidly fixed to the shaft. A row of sliding contacts is fixed to a stationary object so that each contact wipes against the metal disc at a different distance from the shaft. As the disc rotates with the shaft, some of the contacts touch metal, while others fall in the gaps where the metal has been cut out. The metal sheet is connected to a source of electric current, and each contact is connected to a separate electrical sensor. The metal pattern is designed so that each possible position of the axle creates a unique binary code in which some of the contacts are connected to the current source (i.e. switched on) and others are not (i.e. switched off).Optical absolute encoders
The optical encoder's disc is made of glass or plastic with transparent and opaque areas. A light source and photo detector array reads the optical pattern that results from the disc's position at any one time.This code can be read by a controlling device, such as a microprocessor or microcontroller to determine the angle of the shaft.
The absolute analog type produces a unique dual analog code that can be translated into an absolute angle of the shaft (by using a special algorithm).
Incremental rotary encoder
An incremental rotary encoder provides cyclical outputs (only) when the encoder is rotated. They can be either mechanical or optical. The mechanical type requires debouncing and is typically used as digital potentiometers on equipment including consumer devices. Most modern home and car stereos use mechanical rotary encoders for volume control.
Due to the fact the mechanical switches require debouncing, the mechanical type are limited in the rotational speeds they can handle. The incremental rotary encoder is the most widely used of all rotary encoders due to its low cost and ability to provide signals that can be easily interpreted to provide motion related information such as velocity and RPM.
The fact that incremental encoders use only two sensors does not compromise their accuracy. One can find in the market incremental encoders with up to 10,000 counts per revolution, or more.
There can be an optional third output: reference, which happens once every turn. This is used when there is the need of an absolute reference, such as positioning systems.
The optical type is used when higher RPMs are encountered or a higher degree of precision is required.
Incremental encoders are used to track motion and can be used to determine position and velocity. This can be either linear or rotary motion. Because the direction can be determined, very accurate measurements can be made.
 | Rotary Encoder |
 | ENA Series Rotary Encoder |
 | ENC Series Rotary Encoder |
 | ENH Series Rotary Encoder |
Sunday, October 2, 2011
What is a thermocouple?

Temperature Sensor
The American Society for Testing and Materials (ASTM) has defined the term thermocouple as follows:
Thermocouple, n. - in thermometry, the sensor of a thermoelectric thermometer, consisting of electrically conducting circuit elements of two different thermoelectric characteristics joined at a junction. [Vol. 14.03, E 344 - 02 § 3.1 (2007).]
Put differently, a thermocouple occurs when any two different kinds of metals joined at a junction are exposed to a temperature gradient. When the two different metals are exposed to a temperature gradient they generate a very small electrical charge, commonly measured in millivolts, that correlates to the temperature to which the elements are exposed. This phenomenon is sometimes referred to as the Seebeck effect.
Thermocouples can be made of very common materials such as iron and nickel. Thermocouples can also be made of rare and expensive materials such as platinum and rhodium.
THERMOCOUPLE TECHNICAL REFERENCE DATA
Thermocouples are temperature sensors suitable for use with any make of instrument designed or programmed for use with the same type of thermocouple. Thermocouples are based on the principle that when two dissimilar metals are joined a predictable voltage will be generated that relates to the difference in temperature between the measuring junction and the reference junction (connection to the measuring device). The selection of the optimum thermocouple type (metals used in their construction) is based on application temperature, atmosphere, required length of service, accuracy and cost. When a replacement thermocouple is required, it is of the utmost importance that the type of thermocouple type used in the replacement matches that of the measuring instrument. Different thermocouple types have very different voltage output curves. It is also required that thermocouple or thermocouple extension wire, of the proper type, be used all the way from the sensing element to the measuring element. Large errors can develop if this practice is not followed.Wire Size of Thermocouple: Selecting the wire size used in the thermocouple sensor depends upon the application. Generally, when longer life is required for the higher temperatures, the larger size wires should be chosen. When sensitivity is the prime concern, the smaller sizes should be used.
Length of Thermocouple Probe: Since the effect of conduction of heat from the hot end of the thermocouple must be minimized, the thermocouple probe must have sufficient length. Unless there is sufficient immersion, readings will be low. It is suggested the thermocouple be immersed for a minimum distance equivalent to four times the outside diameter of a protection tube or well.
Location of Thermocouple: Thermocouples should always be in a position to have a definite temperature relationship to the work load. Usually, the thermocouple should be located between the work load and the heat source and be located approximately 1/3 the distance from the work load to the heat source.
| Thermocouple Type | Names of Materials | Useful Application Range |
| B | Platinum30% Rhodium (+) Platinum 6% Rhodium (-) |
2500 -3100F 1370-1700C |
| C | W5Re Tungsten 5% Rhenium (+) W26Re Tungsten 26% Rhenium (-) |
3000-4200F 1650-2315C |
| E | Chromel (+) Constantan (-) |
200-1650F 95-900C |
| J | Iron (+) Constantan (-) |
200-1400F 95-760C |
| K | Chromel (+) Alumel (-) |
200-2300F 95-1260C |
| N | Nicrosil (+) Nisil (-) |
1200-2300F 650-1260C |
| R | Platinum 13% Rhodium (+) Platinum (-) |
1600-2640F 870-1450C |
| S | Platinum 10% Rhodium (+) Platinum (-) |
1800-2640F 980-1450C |
| T | Copper (+) Constantan (-) |
-330-660F -200-350C |
GLOSSARY OF TERMS
Cold Junction or Reference Junction - The junction generally at the measuring device that is held at a relatively constant temperature.
Cold Junction Compensation - Measures the ambient temperature at the connection of the thermocouple wire to the measuring device. This allows for accurate computation of the temperature at the hot junction by the measuring device.
Dual Element - Two thermocouple elements housed within one thermocouple hardware assembly.
Extension Wire - Wires which connect the thermocouple itself to a reference junction, i.e. controller, receiver, recorder, etc. Extension wire must be of the same type as the thermocouple. Special plugs and jacks made of the same alloys as the thermocouple should be used if a quick disconnect is required for the application.
Grounded Junction - The internal conductors of this thermocouple are welded directly to the surrounding sheath material, forming a completely sealed integral junction.
Ungrounded Junction - Although the internal thermocouple conductors are welded together they are electrically insulated from the external sheath material and are not connected to the sheath in any way. Ungrounded junction thermocouples are ideal for use in conductive solutions or wherever circuit isolation is required. Ungrounded junctions are required where the measuring instrumentation does not provide channel to channel isolation.
Exposed Junction - The thermocouple junction or measuring point is exposed without any protection assembly or tube. Exposed junction thermocouples due to their design, offer the user the fastest response time.
Hot Junction - The measuring junction.
Immersion Length - The portion of the thermocouple which is subject to the temperature which is being measured.
Measuring Junction - The junction in a thermocouple which actually measures the temperature of the object. Often referred to as the Hot Junction.
Protection Tube - A tube like assembly in which the thermocouple is installed in order to protect the element from harsh environments.
RTD - Abbreviation for Resistance Temperature Detector. It is a sensor which operates on the principle that the resistance increases with an increase in temperature at a specific rate. Commonly manufactured using a platinum resistance element. More accurate and more linear than most thermocouples and generally much more costly and slower responding.
Thermocouple - A temperature sensor based on the principle that a voltage is produced when two dissimilar metals. The junction produces a voltage in proportion to the difference in temperature between the measuring junction and the reference junction.
Thermowell - A threaded or flanged closed end tube which is mounted directly to the process or vessel, designed to protect the thermocouple from the process surroundings.
Thermocouple Color Codes:
Thermocouple wiring is color coded by thermocouple types. Different countries utilize different color coding. Jacket coloring is sometimes a colored stripe instead of a solid color as shown.
Bj Photoelectric Sensor How it Work
Bj Serios Photoelectric Sensor
 |
Autonics BJ Series allows more diverse user convenience by adding its line-up with connector type models to existing long sensing distance type with cable outgoing models. Connector type model is ideal for easy maintenance and simple wiring work comparing to cable outgoing type models; in addition, high performance can be guaranteed with IP67 rated waterproof structure. |
| BJ Series realizes long sensing distance due to newly developed optical lens and superior noise-resistance characteristics. Also, the series implements world-best class sensing performance by minimizing the effect of inverter disturbance light. In addition, it makes adjacent installation possible with mutual interference prevention function and its compact size perfectly supports narrow space installation. A wide range of model line-up including long distance detection type, BGS reflective type, micro spot type and transparent glass sensing type make possible to support more various user’s applications. |
 |
 |
 |
 |
| BJ Series | BJ Series |
Subscribe to:
Comments (Atom)